C++机器学习(1)k-近邻算法


Warning: WP_Syntax::substituteToken(): Argument #1 ($match) must be passed by reference, value given in /www/wwwroot/fawdlstty.com/wp-content/plugins/wp-syntax/wp-syntax.php on line 383

Warning: WP_Syntax::substituteToken(): Argument #1 ($match) must be passed by reference, value given in /www/wwwroot/fawdlstty.com/wp-content/plugins/wp-syntax/wp-syntax.php on line 383

部分资料下载地址: http://pan.baidu.com/s/1bpsgt5t 提取码fwxf
源码下载地址:https://github.com/fawdlstty/hm_ML

又是一个神秘的领域,对于C++程序猿来说,机器学习就像小白对C++一样。什么手写识别,什么自动驾驶,对于C++程序猿来说,几乎是不可能的实现。但如果了解原理之后,机器学习也就这么回事。这篇文章简要介绍机器学习以及用C++实现一个简单的机器学习算法——k-近邻算法。
首先说一下变种病毒。变种病毒的核心实现是动态随机修改指令,用于绕过几乎所有的特征码杀毒引擎,实现上并不是病毒自身会进化,而是仅仅修改了实现方式。从汇编角度上来说,比如以下代码:

1
mov eax, 10h

以上代码的含义是,将16这个立即数放在eax寄存器里面。变种核心模块将以上代码替换为如下形式

1
2
3
4
5
push ebx
mov ebx, 12h
sub ebx, 2h
mov eax, ebx
pop ebx

以上代码的实现效果与上面那一行代码完全相同。如果之前的代码是杀毒引擎标记的特征的话,那么变种病毒经过这次变种后,杀毒引擎就找不到特征了,于是实现了过杀毒引擎的效果。虽然变种病毒听起来很恐怖,但实际上病毒所实现的效果并不会改变,也就是说,以前没有的功能,病毒并不会在自我升级中产生。
继续阅读C++机器学习(1)k-近邻算法

C++11:std::bind实现参数动态绑定


Warning: WP_Syntax::substituteToken(): Argument #1 ($match) must be passed by reference, value given in /www/wwwroot/fawdlstty.com/wp-content/plugins/wp-syntax/wp-syntax.php on line 383

Warning: WP_Syntax::substituteToken(): Argument #1 ($match) must be passed by reference, value given in /www/wwwroot/fawdlstty.com/wp-content/plugins/wp-syntax/wp-syntax.php on line 383

参数动态绑定在实际编程中用的不多,但在特定情况下非常有用。这个功能的意思是,将函数与参数绑定,下次调用时可以不用再次麻烦的传递参数。首先给出一个示例:

1
2
3
4
5
6
7
8
9
10
11
12
13
14
#include <iostream>
#include <string>
#include <functional>
using namespace std;
 
void func (int i, int j) {
    cout < < "i = " << i << ", j = " << j << endl;
}
 
int main(int argc, char* argv[]) {
    function<void (int, int)> f = func;
    f (1, 2);
    return 0;
}</functional></string></iostream>

结果为i = 1, j = 2
以上例子是使用函数对象保存函数地址,然后调用函数对象的示例代码,下面我让函数对象f与参数进行绑定:

1
2
3
4
5
6
7
8
9
10
11
12
13
14
#include <iostream>
#include <string>
#include <functional>
using namespace std;
 
void func (int i, int j) {
    cout < < "i = " << i << ", j = " << j << endl;
}
 
int main(int argc, char* argv[]) {
    function<void ()> f = bind(func, 1, 2);
    f ();
    return 0;
}</functional></string></iostream>

结果为i = 1, j = 2
由于已经绑定了参数1和2,所以在实际调用时不用再次赋值。注意函数对象的声明。
继续阅读C++11:std::bind实现参数动态绑定

C++实现高效字符串查找算法

最近想到一个关于高效字符串查找算法的设想,然后果断实现之,算法基于哈希表,用于源字符串特别长的情况,查找的子字符串越长、越没规律,那么速度越快。可能已经有人做过,不过我撸代码前还没听说过类似算法,算是一种轮子吧。
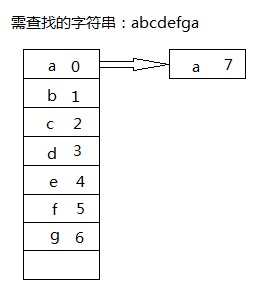
基本实现的思路是:首先建立一个hash_map,然后将子字符串所有字符及位置录入字符串中,如下图所示:
20160401212342
对于需要查找的字符串(比如在很长的字符串文本中查找“abcdefga”这一串字符),构建如上所示哈希表,键值名为子字符串出现的字符,值为出现的位置。
构建好之后呢,就好玩了,我只说说正向查找原理,逆向查找类似。首先,来一个假设,我就假设源字符串为“abababcdefgaaaaa”这样吧,第一次,取源字符串中,(子字符串长度-1)这个位置的字符,值为d,然后取哈希表的值,为3,那么,将源字符串中7-3的位置开始,与子字符串相比较,比较结果较满意,第一次就查找成功,那么直接返回7-3=4。
继续阅读C++实现高效字符串查找算法

C++中Base64编码解码实现


Warning: WP_Syntax::substituteToken(): Argument #1 ($match) must be passed by reference, value given in /www/wwwroot/fawdlstty.com/wp-content/plugins/wp-syntax/wp-syntax.php on line 383
1
2
3
4
5
6
7
8
9
10
11
12
13
14
15
16
17
18
19
20
21
22
23
24
25
26
27
28
29
30
31
32
33
34
35
36
37
38
39
40
41
42
43
44
45
46
47
48
49
50
51
52
53
54
55
56
57
58
59
60
61
62
63
64
65
66
67
68
69
70
71
72
73
template<typename CharT>
class base64 {
public:
    //base64 加密
    static bool encode (std::basic_string<charT>& _old, std::basic_string<charT>& _new) {
        static charT _code [] = {
            'A', 'B', 'C', 'D', 'E', 'F', 'G', 'H',   'I', 'J', 'K', 'L', 'M', 'N', 'O', 'P',
            'Q', 'R', 'S', 'T', 'U', 'V', 'W', 'X',   'Y', 'Z', 'a', 'b', 'c', 'd', 'e', 'f',
            'g', 'h', 'i', 'j', 'k', 'l', 'm', 'n',   'o', 'p', 'q', 'r', 's', 't', 'u', 'v',
            'w', 'x', 'y', 'z', '0', '1', '2', '3',   '4', '5', '6', '7', '8', '9', '+', '/',
        };
        ptrdiff_t i, len = _old.length ();
        _new.resize (((len % 3 ? 1 : 0) + len / 3) * 4);
        //主编码循环
        for (i = 0; i < len / 3; ++i) {
            _new [i * 4] = _code [_old [i * 3] >> 2];
            _new [i * 4 + 1] = _code [((_old [i * 3] & 0x03) << 4) | (_old [i * 3 + 1] >> 4)];
            _new [i * 4 + 2] = _code [((_old [i * 3 + 1] & 0x0F) << 2) | (_old [i * 3 + 2]) >> 6];
            _new [i * 4 + 3] = _code [_old [i * 3 + 2] & 0x3F];
        }
        //长度不为3的倍数
        if (len % 3) {
            //第一字节肯定不会溢出,故不检查边界
            _new [i * 4] = _code [_old [i * 3] >> 2];
            _new [i * 4 + 1] = _code [((_old [i * 3] & 0x03) << 4) | (i * 3 + 1 < len ? _old [i * 3 + 1] >> 4 : 0)];
            //倒数第二位可能为'='
            if (1 == len % 3)
                _new [i * 4 + 2] = '=';
            else
                _new [i * 4 + 2] = _code [(i * 3 + 1 < len ? (_old [i * 3 + 1] & 0x0F) << 2 : 0)];
            //末位肯定为'='
            _new [i * 4 + 3] = '=';
        }
        return true;
    }
 
    //base64 解密
    static bool decode (std::string& _old, std::string& _new) {
        static charT _ucode [] = {
            0,  0,  0,  0,  0,  0,  0,  0,    0,  0,  0,  0,  0,  0,  0,  0,
            0,  0,  0,  0,  0,  0,  0,  0,    0,  0,  0,  0,  0,  0,  0,  0,
            0,  0,  0,  0,  0,  0,  0,  0,    0,  0,  0,  62, 0,  0,  0,  63,
            52, 53, 54, 55, 56, 57, 58, 59,   60, 61, 0,  0,  0,  64, 0,  0,
            0,  0,  1,  2,  3,  4,  5,  6,    7,  8,  9,  10, 11, 12, 13, 14,
            15, 16, 17, 18, 19, 20, 21, 22,   23, 24, 25, 0,  0,  0,  0,  0,
            0,  26, 27, 28, 29, 30, 31, 32,   33, 34, 35, 36, 37, 38, 39, 40,
            41, 42, 43, 44, 45, 46, 47, 48,   49, 50, 51, 0,  0,  0,  0,  0,
        };
        ptrdiff_t i, len = _old.length ();
        ptrdiff_t len2 = len / 4 * 3;
        //判断末位是否有等号、有几个等号
        if ('=' == _old [len - 2])
            len2 -= 2;
        else if ('=' == _old [len - 1])
            len2--;
        else if (len % 4)
            len2 += (len % 4 - 1);
        _new.resize (len2);
        //主解密循环
        for (i = 0; i < len2 / 3; ++i) {
            _new [i * 3] = (_ucode [_old [i * 4]] << 2) | (_ucode [_old [i * 4 + 1]] >> 4);
            _new [i * 3 + 1] = ((_ucode [_old [i * 4 + 1]] & 0x0F) << 4) | (_ucode [_old [i * 4 + 2]] >> 2);
            _new [i * 3 + 2] = ((_ucode [_old [i * 4 + 2]] & 0x03) << 6) | (_ucode [_old [i * 4 + 3]]);
        }
        //末位为一个或两个等号的情况,这时候不能通过主解密循环进行解密
        if (len2 % 3) {
            _new [i * 3] = (_ucode [_old [i * 4]] << 2) | (_ucode [_old [i * 4 + 1]] >> 4);
            if (2 == len % 3)
                _new [i * 3 + 1] = ((_ucode [_old [i * 4 + 1]] & 0x0F) << 4) | (_ucode [_old [i * 4 + 2]] >> 2);
        }
        return true;
    }
};

C++中std::string实现trim、format等函数


Warning: WP_Syntax::substituteToken(): Argument #1 ($match) must be passed by reference, value given in /www/wwwroot/fawdlstty.com/wp-content/plugins/wp-syntax/wp-syntax.php on line 383
1
2
3
4
5
6
7
8
9
10
11
12
13
14
15
16
17
18
19
20
21
22
23
24
25
26
27
28
29
30
31
32
33
34
35
36
37
38
39
40
41
42
43
44
45
46
47
48
49
50
51
52
53
54
55
56
57
58
59
60
61
62
63
64
65
66
67
68
69
70
71
72
73
74
75
76
77
78
79
80
81
82
83
84
85
86
87
88
89
90
91
92
93
94
95
96
97
98
99
100
101
102
103
104
105
106
107
108
109
110
111
112
113
114
115
116
117
118
119
120
121
122
123
124
////////////////////////////////////////////////////////////////////////////////
//
//  File Name:      String.hpp
//  Class Name:     hString
//  Description:    用于字符串相关扩展操作
//  Author:         Fawdlstty
//
//  Date:           Nov 19, 2016
//  Log:            Create this file.
//
////////////////////////////////////////////////////////////////////////////////


#ifndef __STRING_HPP__
#define __STRING_HPP__


#include <string>
#include <cstdarg>


template<typename charT>
class hString {
public:
    //清除字符串开始部分空格
    static void trimLeft (std::basic_string<charT> &str) {
        str.erase (0, str.find_first_not_of (' '));
    }
 
    //清除字符串结束部分空格
    static void trimRight (std::basic_string<charT> &str) {
        str.erase (str.find_last_not_of (' ') + 1);
    }
 
    //清楚两端空格
    static void trim (std::basic_string<charT> &str) {
        str.erase (0, str.find_first_not_of (' '));
        str.erase (str.find_last_not_of (' ') + 1);
    }
 
    //删除字符串中指定字符
    static void erase (std::basic_string<charT> &str, const charT &charactor) {
        str.erase (remove_if (str.begin (), str.end (), bind2nd (std::equal_to<charT> (), charactor)), str.end ());
    }
 
    //替换字符串中指定字符串
    static int replace (std::basic_string<charT> &str, const std::basic_string<charT> &strObj, const std::basic_string<charT> &strDest) {
        int ret = 0;
        charT pos = str.find (strObj);
        while (pos != std::basic_string<charT>::npos) {
            ret++;
            str.replace (pos, strObj.size (), strDest);
            pos = str.find (strObj);
        }
        return ret;
    }
 
    //一行中的字符串截断,并可转为其他类型
    template<typename T>
    static int split_aLine_conv (const std::basic_string<charT> &str, std::vector<T> &seq, charT separator) {
        if (str.empty ()) return 0;
        int count = 0;
        std::basic_stringstream<charT> bs (str);
        for (std::basic_string<charT> s; std::getline (bs, s, separator); count++) {
            typename T val;
            std::basic_stringstream<charT> bss (s);
            bss >> val;
            seq.push_back (val);
        }
        return count;
    }
 
    //字符串截断
    static void split (std::basic_string<charT> s, std::vector<std::basic_string<charT> >& v, char ch = ' ') {
        ptrdiff_t start = 0, p, len = s.length ();
        do {
            p = s.find (ch, start);
            if (p == -1) p = len;
            s [p] = '\0';
            if (s [start] != '\0') v.push_back (&s [start]);
            start = p + 1;
        } while (start < len);
    }
 
    //字符串格式化
    static std::basic_string<charT> format (std::basic_string<charT> fmt_str, ...) {
        //来源:http://stackoverflow.com/questions/2342162/stdstring-formatting-like-sprintf
        ptrdiff_t final_n, n = ((ptrdiff_t) fmt_str.size ()) * 2;
        std::basic_string<charT> str;
        std::unique_ptr<charT []> formatted;
        va_list ap;
        while (1) {
            formatted.reset (new charT [n]);
            //strcpy_s (&formatted [0], fmt_str.size (), fmt_str.c_str ());
            va_start (ap, fmt_str);
            final_n = vsnprintf_s (&formatted [0], n, _TRUNCATE, fmt_str.c_str (), ap);
            va_end (ap);
            if (final_n < 0 || final_n >= n)
                n += abs (final_n - n + 1);
            else
                break;
        }
        return std::basic_string<charT> (formatted.get ());
    }
};


typedef hString<char> hStringA;
typedef hString<wchar_t> hStringW;
#ifdef _UNICODE
typedef hStringW hString_t;
typedef std::wstring string_t;
#else
typedef hStringA hString_t;
typedef std::string string_t;
#endif


#endif //__STRING_HPP__

ASP.Net 后台访问Cookie的封装


Warning: WP_Syntax::substituteToken(): Argument #1 ($match) must be passed by reference, value given in /www/wwwroot/fawdlstty.com/wp-content/plugins/wp-syntax/wp-syntax.php on line 383

这是一个类,用于提供后台C#访问Cookie,函数不多,只有几个,包括设置、获取、修改。具体代码如下:

1
2
3
4
5
6
7
8
9
10
11
12
13
14
15
16
17
18
19
20
21
22
23
24
25
26
27
28
29
30
31
32
33
34
35
36
37
38
39
40
41
42
43
44
45
46
47
48
49
50
51
52
53
54
55
56
57
58
59
60
61
62
63
64
65
66
67
68
69
70
71
72
73
74
75
76
77
78
79
80
81
82
83
84
85
using System;
using System.Collections.Generic;
using System.Web;
using System.Text;
 
namespace SqlHelper {
	public class Cookie2 {
		/// <summary>
		/// 设置Cookie的值,关闭Session后释放
		/// </summary>
		/// <param name="name">名称</param>
		/// <param name="value">Cookie值</param>
		/// <param name="response">HttpResponse</param>
		public static void Set (HttpResponse response, string name, string value) {
			HttpCookie cookie = new HttpCookie (name);
			cookie.Values.Add (name, value);
			response.AppendCookie (cookie);
		}


		/// <summary>
		/// 设置Cookie的值,包含过期时间
		/// </summary>
		/// <param name="name">名称</param>
		/// <param name="value">Cookie值</param>
		/// <param name="expiredays">过期时间</param>
		/// <param name="response">HttpResponse</param>
		public static void Set (HttpResponse response, string name, string value, DateTime expiredays) {
			HttpCookie cookie = new HttpCookie (name);
			cookie.Expires = expiredays;
			cookie.Values.Add (name, value);
			response.AppendCookie (cookie);
		}


		/// <summary>
		/// 获取Cookie值
		/// </summary>
		/// <param name="name">名称</param>
		/// <param name="request">HttpRequest</param>
		/// <returns>Cookie的值</returns>
		public static string Get (HttpRequest request, string name) {
			if (request.Cookies[name] != null) {
				return request.Cookies[name].Values.toString();
			} else {
				return null;
			}
		}


		/// <summary>
		/// 删除Cookie
		/// </summary>
		/// <param name="name">名称</param>
		/// <param name="response">HttpResponse</param>
		/// <param name="request">HttpRequest</param>
		public static void Delete (HttpResponse response, HttpRequest request, string name) {
			HttpCookie cookie = request.Cookies[name];
			if (cookie != null) {
				cookie.Expires = DateTime.Now.AddDays (-1);
				response.AppendCookie (cookie);
			}
		}


		/// <summary>
		/// 修改Cookie的值
		/// </summary>
		/// <param name="name">名称</param>
		/// <param name="value">Cookie值</param>
		/// <param name="response">HttpResponse</param>
		/// <param name="request">HttpRequest</param>
		public static void Modify (HttpResponse response, HttpRequest request, string name, string value) {
			HttpCookie cookie = request.Cookies[name];
			if (cookie != null) {
				cookie.Values[name] = value;
			}
			response.AppendCookie (cookie);
		}
	}
}

C#访问数据库SqlHelper的封装及如何访问Excel

SqlHelper这名称代表一个库,用于访问数据库的简单封装。比如一个完整的数据库查询过程:首先创建链接,然后判断链接是否有效,然后创建查询参数列表,然后调用查询语句,然后处理数据,最后关闭链接。说起来就感觉这东西有点复杂,一般有经验的程序猿都从方便自身角度对SqlHelper进行一定程度的封装,简化对数据库的调用。每个玩过数据库的程序猿都有一个,我的长这样:
继续阅读C#访问数据库SqlHelper的封装及如何访问Excel

C++/SDK界面开发总结

这年代用C++/SDK开发界面的不多了,不是入门研究那绝壁是情怀,不过这东西还是有用,虽然麻烦了点,但可以使生成的exe文件非常小,对于一些对exe文件大小以及响应速度非常在乎的来说,这还是很好的选择
为避免误人子弟,这儿贴几个关键字,对于开发Windows窗体程序来说,这些都是不错的选择,1为个人最推荐使用的,2为其次,以此类推

  1. WinForm/WPF:这个就强大了,两种界面开发模式几乎可以满足在任何条件下的需要,并且C#程序可以在Linux下运行,在Windows下几乎无敌,只是响应比SDK界面稍微慢点,目测是几十毫秒的延迟
  2. wxWidgets:跨平台、强大的界面库,相对于Qt来说是优点是完全无限制,缺点是用的人并没Qt多,开发者社区人少
  3. UILib:强大的DuiLib的升级版,优点是小巧、免费,缺点是只支持Windows平台,另外由于DuiLib作者不参与维护后,建立的UiLib维护机制相当散乱,相当于一堆高手参与维护但基本是自己维护自己的
  4. MFC:对于新手入门来说,这就是麻烦C;对于用过几年MFC的来说,能用MFC就绝不用SDK;个人感觉,这库还是相当不错的,至少没SDK麻烦
  5. Qt:跨平台、强大的界面库,唯一瑕疵是使用LGPL开源协议,只可使用动态链接库,对于静态链接要收费
  6. WTL:从入门角度来说,WTL比MFC稍微简单点,效果比MFC炫酷,不过这个很久没更新咯,最新版本貌似是07年的
  7. CB++/Delphi:这个实际上就是C++ Builder自带的界面库VCL,开发环境一般为C++ Builder 6或者RAD Studio,对于新手来说开发界面相当轻松,不过有一个很大的问题,C++ Builder 6有时候会出BUG,RAD Studio与Visual Studio不兼容。另外Delphi 7开发界面还是很不错的,用的也是VCL界面库,但我不喜欢Pascal的语法,所以也没深入研究这个

继续阅读C++/SDK界面开发总结

C++11:智能指针


Warning: WP_Syntax::substituteToken(): Argument #1 ($match) must be passed by reference, value given in /www/wwwroot/fawdlstty.com/wp-content/plugins/wp-syntax/wp-syntax.php on line 383

智能指针,顾名思义,也就是自动回收内存的指针形式,不用程序员刻意去释放,提高软件开发效率,同时也会提高软件鲁棒性。
C++11一共有4个智能指针,分别为auto_ptr、unique_ptr、shared_ptr、weak_ptr。其中auto_ptr由于存在设计问题,被标记为“已弃用”,将在未来某个C++版本中被移除。本文主要介绍其他三个指针形式。使用前首先包含 这个头文件
1、unique_ptr
这个智能指针的含义为,智能指针所管理的内存区域为独占状态,当另一个unique_ptr访问当前指针时,当前指针会失效,内存的控制权交给新指针。示例如下:

1
2
3
4
5
6
7
8
9
10
11
12
13
14
15
16
17
18
19
20
21
22
#include <iostream>
#include <memory>
using namespace std;
 
void test_ptr (unique_ptr<int> p) {
}
 
int main (int argc, char* argv []) {
    //构造一个unique_ptr
    unique_ptr</int><int> p = make_unique</int><int> (5);
    //打印指针内容
    cout < < *p << endl;
    //修改指针内容
    *p = 100;
    //打印指针内容
    cout << *p << endl;
    //将控制权交给函数参数
    test_ptr (move (p));
    //测试指针是否有效
    cout << p.get () << endl;
    return 0;
}

首先构造一个unique_ptr。unique_ptr构造方式以前一般为 unique_ptr p (new int); 这样的形式,构造时直接包含一个指针。后来在C++14中引入了make_unique,建议统一写成这样的格式。
构造时设置初始值为5,打印结果也为5,然后设置指针内容为100,这儿打印出来的结果也为100,然后使用移动语义,将控制权交给test_ptr函数,这时候main函数中p指针失效,然后函数什么也不做,当它返回时,实际上已经将指针指向的内存释放了。然后我们调用 get() 函数获取智能指针管理的指针地址,打印结果为00000000
可见智能指针用法上还是很简单的。
继续阅读C++11:智能指针

C++11:多线程与锁


Warning: WP_Syntax::substituteToken(): Argument #1 ($match) must be passed by reference, value given in /www/wwwroot/fawdlstty.com/wp-content/plugins/wp-syntax/wp-syntax.php on line 383

多线程是小型软件开发必然的趋势。C++11将多线程相关操作全部集成到标准库中了,省去了某些坑库的编译,真是大大的方便了软件开发。多线程这个库简单方便实用,下面给出简单的例子

1
2
3
4
5
6
7
8
9
10
11
12
13
14
15
16
17
18
19
20
21
22
23
24
25
26
#include <iostream>
#include <thread>
#include <mutex>
using namespace std;
 
volatile int val;
mutex mut;
 
void icrement () {
    for (int i = 0; i < 100000000; i++) {
        mut.lock ();
        val++;
        mut.unlock ();
    }
}
 
int main (int argc, char* argv []) {
    //创建两个线程
    thread t1 (icrement);
    thread t2 (icrement);
    //等待两个线程执行完
    t1.join ();
    t2.join ();
    cout << val << endl;
    return 0;
}

概念有点多。首先得引入thread与mutex这两个头文件,其中thread与线程有关,mutex与锁有关。然后是两个全局变量,由于两个线程都会访问,所以加上volatile关键字,代表不要对这变量进行优化,然后是mutex,这个就是锁咯。
然后,下面的main函数中,首先创建两个线程,然后等待两个线程执行完,然后输出结果。最后是increment函数,这函数循环一亿次,不停的加锁解锁,控制着val变量的访问。锁还提供一个函数,比如这样调用 mut.try_lock (); ,立即返回bool类型,true代表加锁成功,false代表加锁失败。
继续阅读C++11:多线程与锁

C++11:原子操作


Warning: WP_Syntax::substituteToken(): Argument #1 ($match) must be passed by reference, value given in /www/wwwroot/fawdlstty.com/wp-content/plugins/wp-syntax/wp-syntax.php on line 383

在多线程开发中,为了确保数据安全性,经常需要对数据进行加锁、解锁处理。C++11中引入了原子的概念,简而言之就是访问它时它自动加锁解锁,从而使软件开发更为简便。
原子可谓一个既简单又复杂的概念。简单到访问它时就跟单线程访问一块内存一样简单,复杂的地方在于它的实现涉及到各种内存模型,在优化中经常会遇到。
下面给出一个简单的原子示例:

1
2
3
4
5
6
7
8
9
10
11
12
13
14
15
16
17
18
19
20
21
22
#include <iostream>
#include <thread>
#include <atomic>
using namespace std;
atomic_int val = { 0 };//这个类型也可以写作 atomic<int> 用于表示整型数据的原子
 
void icrement () {
    for (int i = 0; i < 100000000; i++) {
        val++;
    }
}
 
int main (int argc, char* argv []) {
    //创建两个线程
    thread t1 (icrement);
    thread t2 (icrement);
    //等待两个线程执行完
    t1.join ();
    t2.join ();
    cout << val << endl;
    return 0;
}

经过十几秒左右的等待后,代码执行完毕,结果不出所料,200000000。简单的原子操作差不多就是这样,atomic模板可以包括任何类型,另外原子的操作也与它本身的操作方式基本相同,因为原子模板重载了所有的运算符。
继续阅读C++11:原子操作

C++11:lambda表达式


Warning: WP_Syntax::substituteToken(): Argument #1 ($match) must be passed by reference, value given in /www/wwwroot/fawdlstty.com/wp-content/plugins/wp-syntax/wp-syntax.php on line 383

Warning: WP_Syntax::substituteToken(): Argument #1 ($match) must be passed by reference, value given in /www/wwwroot/fawdlstty.com/wp-content/plugins/wp-syntax/wp-syntax.php on line 383

这个实现的效果类似于匿名函数,不像C++98/03那样一个函数所有人都能调用,不公开不必要的接口,提高程序安全性。
首先来写个最简单的lambda表达式。

1
[]{};

对,5个字符就成为了一个lambda表达式了,虽然并没卵用,不过至少跨出了一步。这个lambda表达式实际上是精简后的表达式。不加以精简的话,原表达式应该像这样:

1
[](){};

看起来挺简单的,我也这么觉得:)
解释下,首先一对方括号代表捕获列表,含义后面再解释。然后是一对圆括号,代表lambda函数的参数列表,当参数为空可省略这对圆括号,就像上面5个字符的lambda表达式这样。接下来是一对大括号,这个和函数的大括号没什么区别了,里面可以加代码,可以加return。
继续阅读C++11:lambda表达式

C++11:变长模板的迭代与递归扩展


Warning: WP_Syntax::substituteToken(): Argument #1 ($match) must be passed by reference, value given in /www/wwwroot/fawdlstty.com/wp-content/plugins/wp-syntax/wp-syntax.php on line 383

Warning: WP_Syntax::substituteToken(): Argument #1 ($match) must be passed by reference, value given in /www/wwwroot/fawdlstty.com/wp-content/plugins/wp-syntax/wp-syntax.php on line 383

迭代的运行效率始终强于递归,递归始终比迭代方便开发。
变长模板属于C++11中比较复杂的技术,在此简单介绍下。在此贴出一个变长模板代码,为方便起见,参数类型全为int。如果需要不同的参数类型,只需要重载模板代码即可:

1
2
3
4
5
6
7
8
9
10
11
12
#include <iostream>
using namespace std;
 
template<class ... Args>
int Sum (Args... args) {
    return sizeof...(args);
}
 
int main (int argc, char* argv []) {
    cout < < Sum (1,2,23,124,4,23,43,24,32,4,23) << endl;
    return 0;
}

这是一个最简单的变长模板,首先是template定义,class后面加三个点就代表不固定长度。
接下来是Sum函数,在main函数的调用中实例化,被扩展为如下形式:

1
int Sum(int,int,int,int,int,int,int,int,int,int,int);

传了11个参数,就被实例化为11个参数形式。然后是sizeof...,这个宏是用来获取变长模板中元素的个数用的。我们调用时传了11个参数,它就返回11。程序运行的结果也相应为11。变长模板对于变长参数的优势之一为第一个参数不用定义参数个数(关于变长参数的访问详见深度研究C语言变长函数),但相应的劣势为无法直接访问参数。文章后面将简要介绍如何调用参数。
继续阅读C++11:变长模板的迭代与递归扩展

js前台获取URL参数


Warning: WP_Syntax::substituteToken(): Argument #1 ($match) must be passed by reference, value given in /www/wwwroot/fawdlstty.com/wp-content/plugins/wp-syntax/wp-syntax.php on line 383

Warning: WP_Syntax::substituteToken(): Argument #1 ($match) must be passed by reference, value given in /www/wwwroot/fawdlstty.com/wp-content/plugins/wp-syntax/wp-syntax.php on line 383

对于网页前台,有时候是需要获取网页参数的,比如https://www.fawdlstty.com/?p=57,js如何获取参数呢?这一个参数还好,如果参数多了那么解析就费事了。下面提供一种方法实现最便捷的方式获取网页参数。实现代码如下:

1
2
3
4
5
6
7
8
9
10
11
12
function getRequest() {
	var url = location.search;
	var obj = {};
	if (url.indexOf('?') != -1) {
		url = url.substring(url.indexOf('?') + 1).split('&');
		for (var i = 0; i < url.length; i++) {
			var strs = url[i].split('=');
			obj[strs[0]] = unescape(strs[1]);
		}
	}
	return obj;
}

代码量很小,使用方式如下,比如,获取参数名为p的值:

1
2
var param = getRequest();
alert(param['p']);

调用也是相当方便呢

ASP.Net前台提交Post后,后台Session为空的解决

ASP.Net会在WebForm中加入一两个隐藏的参数(有时候是一个有时候是两个),用于提交form表单时识别Session,如下图所示:
vierstate
然而直接通过$.post()向后台提交信息,后台是得不到这两个参数的,故而无法识别Session,从而导致Session为空。除此之外,前台提交new FormData()生成的表单,后台也无法识别。解决方法是直接在Post参数中加入这两个临时变量即可。
继续阅读ASP.Net前台提交Post后,后台Session为空的解决

让jQuery.css()方法支持important属性


Warning: WP_Syntax::substituteToken(): Argument #1 ($match) must be passed by reference, value given in /www/wwwroot/fawdlstty.com/wp-content/plugins/wp-syntax/wp-syntax.php on line 383

Warning: WP_Syntax::substituteToken(): Argument #1 ($match) must be passed by reference, value given in /www/wwwroot/fawdlstty.com/wp-content/plugins/wp-syntax/wp-syntax.php on line 383

jQuery的css()方法支持直接设置元素的element,真是方便了你我他,美中不足的是不支持important属性。网上的一些高手就出了对策,下面转载一个个人认为相当不错的实现。
来源:http://stackoverflow.com/questions/2655925/how-to-apply-important-using-css

1
2
3
4
5
6
7
8
9
10
11
12
13
14
15
16
17
18
19
20
21
22
23
24
25
26
27
28
29
30
31
32
33
34
35
36
37
38
39
40
41
42
43
44
45
46
47
48
49
50
51
52
53
54
55
56
57
58
59
60
61
(function($) {    
	if ($.fn.style) {
		return;
	}
 
	// Escape regex chars with \
	var escape = function(text) {
		return text.replace(/[-[\]{}()*+?.,\\^$|#\s]/g, "\\$&");
	};
 
	// For those who need them (< IE 9), add support for CSS functions
	var isStyleFuncSupported = !!CSSStyleDeclaration.prototype.getPropertyValue;
	if (!isStyleFuncSupported) {
		CSSStyleDeclaration.prototype.getPropertyValue = function(a) {
			return this.getAttribute(a);
		};
		CSSStyleDeclaration.prototype.setProperty = function(styleName, value, priority) {
			this.setAttribute(styleName, value);
			var priority = typeof priority != 'undefined' ? priority : '';
			if (priority != '') {
				// Add priority manually
				var rule = new RegExp(escape(styleName) + '\\s*:\\s*' + escape(value) + '(\\s*;)?', 'gmi');
				this.cssText = this.cssText.replace(rule, styleName + ': ' + value + ' !' + priority + ';');
			}
		};
		CSSStyleDeclaration.prototype.removeProperty = function(a) {
			return this.removeAttribute(a);
		};
		CSSStyleDeclaration.prototype.getPropertyPriority = function(styleName) {
			var rule = new RegExp(escape(styleName) + '\\s*:\\s*[^\\s]*\\s*!important(\\s*;)?', 'gmi');
			return rule.test(this.cssText) ? 'important' : '';
		}
	}
 
	// The style function
	$.fn.style = function(styleName, value, priority) {
		// DOM node
		var node = this.get(0);
		// Ensure we have a DOM node
		if (typeof node == 'undefined') {
			return this;
		}
		// CSSStyleDeclaration
		var style = this.get(0).style;
		// Getter/Setter
		if (typeof styleName != 'undefined') {
			if (typeof value != 'undefined') {
				// Set style property
				priority = typeof priority != 'undefined' ? priority : '';
				style.setProperty(styleName, value, priority);
				return this;
			} else {
				// Get style property
				return style.getPropertyValue(styleName);
			}
		} else {
			// Get CSSStyleDeclaration
			return style;
		}
	};
})(jQuery);

调用方式:

1
2
3
4
5
6
7
8
9
$('#id').style('display', 'block !important');
//上面是我认为最好理解的调用方式,下面是作者给出的调用方式
var div = $('someDiv');
console.log(div.style('color'));
div.style('color', 'red');
console.log(div.style('color'));
div.style('color', 'blue', 'important');
console.log(div.style('color'));
console.log(div.style().getPropertyPriority('color'));

js Array扩展方法


Warning: WP_Syntax::substituteToken(): Argument #1 ($match) must be passed by reference, value given in /www/wwwroot/fawdlstty.com/wp-content/plugins/wp-syntax/wp-syntax.php on line 383

js的Array对象的处理能力比较强大,下面几个函数是给它再新增几个扩展方法使其更方便使用
部分方法在最新版Webkit已经实现,但由于IE8等低端浏览器还占有大批用户,所以还得实现一遍,另外splice不是很方便使用,个人感觉用insert、remove方法更直观

1
2
3
4
5
6
7
8
9
10
11
12
13
14
15
16
17
18
19
20
21
22
23
24
25
26
27
28
29
30
31
32
33
34
35
36
37
38
39
40
41
42
43
44
45
46
47
48
49
50
51
//数组处理程序
if (!Array.prototype.forEach) {
	Array.prototype.forEach = function (callback, thisArg) {
		var T, k;
		if (this == null) {
			throw new TypeError(" this is null or not defined");
		}
		var O = Object(this);
		var len = O.length >>> 0; // Hack to convert O.length to a UInt32  
		if ({}.toString.call(callback) != "[object Function]") {
			throw new TypeError(callback + " is not a function");
		}
		if (thisArg) {
			T = thisArg;
		}
		k = 0;
		while (k < len) {
			var kValue;
			if (k in O) {
				kValue = O[k];
				callback.call(T, kValue, k, O);
			}
			k++;
		}
	};
}
 
//查询数组中是否存在元素
if (!Array.prototype.in_array) {
	Array.prototype.in_array = function (e) {
		for (i = 0; i < this.length; i++) {
			if (this[i] == e)
				return true;
		}
		return false;
	}
}
 
//插入元素
if (!Array.prototype.insert) {
	Array.prototype.insert = function (index, elem) {
		return this.splice(index, 0, elem);
	}
}
 
//删除元素
if (!Array.prototype.remove) {
	Array.prototype.remove = function (index) {
		return this.splice(index, 1);
	}
}

js日期格式化的实现


Warning: WP_Syntax::substituteToken(): Argument #1 ($match) must be passed by reference, value given in /www/wwwroot/fawdlstty.com/wp-content/plugins/wp-syntax/wp-syntax.php on line 383

功能比较简单,一个函数实现

1
2
3
4
5
6
7
8
9
10
11
12
13
14
15
16
17
18
19
20
if (!Date.prototype.Format) {
	Date.prototype.Format = function (formatStr) {
		var str = formatStr;
		var Week = ['日', '一', '二', '三', '四', '五', '六'];
		str = str.replace(/yyyy|YYYY/, this.getFullYear());
		str = str.replace(/yy|YY/, (this.getYear() % 100) > 9 ? (this.getYear() % 100).toString() : '0' + (this.getYear() % 100));
		str = str.replace(/MM/, this.getMonth() > 9 ? this.getMonth().toString() : '0' + this.getMonth());
		str = str.replace(/M/g, this.getMonth());
		str = str.replace(/w|W/g, Week[this.getDay()]);
		str = str.replace(/dd|DD/, this.getDate() > 9 ? this.getDate().toString() : '0' + this.getDate());
		str = str.replace(/d|D/g, this.getDate());
		str = str.replace(/hh|HH/, this.getHours() > 9 ? this.getHours().toString() : '0' + this.getHours());
		str = str.replace(/h|H/g, this.getHours());
		str = str.replace(/mm/, this.getMinutes() > 9 ? this.getMinutes().toString() : '0' + this.getMinutes());
		str = str.replace(/m/g, this.getMinutes());
		str = str.replace(/ss|SS/, this.getSeconds() > 9 ? this.getSeconds().toString() : '0' + this.getSeconds());
		str = str.replace(/s|S/g, this.getSeconds());
		return str;
	}
}

这里给Date对象增加一个Format属性,调用方法示例:date.Format('yyyy-MM-dd');