Warning: WP_Syntax::substituteToken(): Argument #1 ($match) must be passed by reference, value given in /www/wwwroot/fawdlstty.com/wp-content/plugins/wp-syntax/wp-syntax.php on line 383
Warning: WP_Syntax::substituteToken(): Argument #1 ($match) must be passed by reference, value given in /www/wwwroot/fawdlstty.com/wp-content/plugins/wp-syntax/wp-syntax.php on line 383

https加密访问有好处也有坏处,好处主要有别人无法嗅探到通讯内容,网址的绿锁图标也代表安全,坏处也有比如消耗服务器端资源,另外也无法提供适用的cdn加速,主要看个人取舍。证书主要有两种,主要面向个人用户与企业用户。个人型证书一般可以免费申领,主要效果是网址前面有绿锁图标,企业型证书需要购买,可以在网址前面显示公司名称等。
免费SSL证书可以在 沃通 、 StarSSL 或 Let's Encrypt 上获得,其中沃通和StarSSL是申请,Let's Encrypt是在服务器上安装指定软件,验证之后生成证书。
生成之后是安装证书。对于不同服务器架构可能会不同,找到目标服务器对应的证书版本,上传至服务器,比如我的是nginx,配置文件改为如下形式:
1 2 3 4 5 6 7 8 9 10 11 12 13 14 15 16 17 18 19 20 21 22 23 24 25 26 27 28 29 | server { listen 80; server_name localhost; location / { set $flag 1; if ($http_user_agent ~* (baiduspider|soso|sogou|yahoo|sohu-search|yodao|YoudaoBot|robozilla|msnbot|MJ12bot|NHN|Twiceler)){ set $flag 0; } if ($flag = 1){ rewrite ^/(.*)$ https://www.fawdlstty.com/$1 redirect; } root ...; index index.html index.htm index.php; if (!-e $request_filename){ rewrite ^/archives/(\d+)\.html$ /index.php?p=$1; ... rewrite ^/([^\.]+)$ /index.php?$1; } } ... location ~ \.php$ { root ...; fastcgi_pass 127.0.0.1:9000; fastcgi_index index.php; fastcgi_param SCRIPT_FILENAME $document_root$fastcgi_script_name; #/scripts$fastcgi_script_name; include fastcgi_params; } } |
主要是针对国内比较低端的机器人提供http访问接口,其他全部转https,其他保持不变就好,然后443接口那儿再改成如下形式:
1 2 3 4 5 6 7 8 9 10 11 12 13 14 15 16 17 18 19 20 21 22 23 24 25 26 27 28 29 30 31 | server { listen 443 ssl; server_name localhost; ssl_certificate /.../1_fawdlstty.com_bundle.crt; ssl_certificate_key /.../2_fawdlstty.com.key; ssl_session_cache shared:SSL:1m; ssl_session_timeout 5m; ssl_ciphers HIGH:!aNULL:!MD5; ssl_prefer_server_ciphers on; location / { root ...; index index.html index.htm index.php; if (!-e $request_filename){ rewrite ^/archives/(\d+)\.html$ /index.php?p=$1; ... rewrite ^/([^\.]+)$ /index.php?$1; } } ... location ~ \.php$ { root ...; fastcgi_pass 127.0.0.1:9000; fastcgi_index index.php; fastcgi_param SCRIPT_FILENAME $document_root$fastcgi_script_name; #/scripts$fastcgi_script_name; include fastcgi_params; } } |
与80端口基本一样,主要是端口的改动的差别。ssl_certificate、ssl_certificate_key分别填上两个上传到服务器的证书秘钥的路径。填好之后重启nginx,就可以发现网站可以提供http访问了。
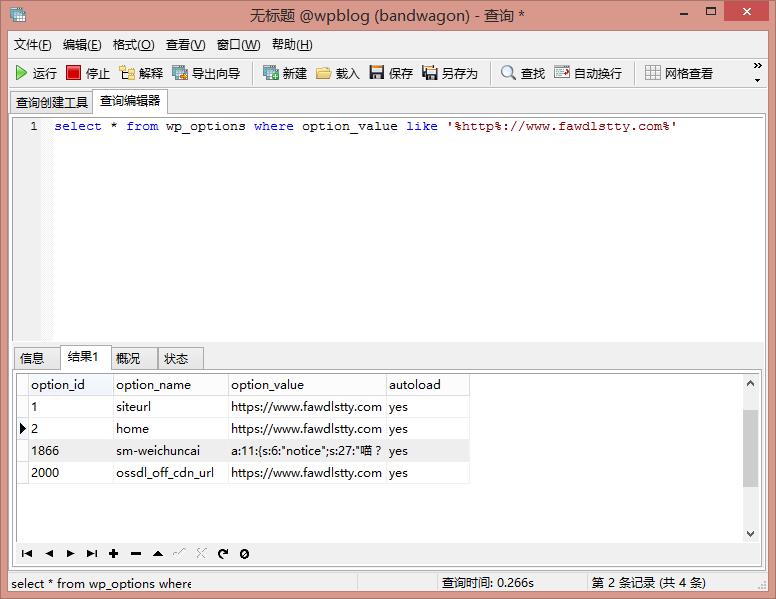
然后并没有绿锁出现,这时候主要原因为还有非https资源的引用。Chrome下按F12,然后按Console,就列出了所有非https资源引用。如果想要网站地址前面出现绿锁,那么必须所有连接均为https才行。这时候需要改动数据库,我这儿使用Navicat for MySQL连接我服务器的数据库,这儿部分被我改过,大概为下图:

将所有http链接替换为https链接,然后重启服务器,就绿锁了。
百度云加速貌似提供了https加速功能
好像基本都可以吧,需要上传key,然而我这博客没备案用不了cdn,也不知道怎么备案2333